# 《css揭秘》学习笔记
# 1. 引言
# 1). --accent-color和currentColor
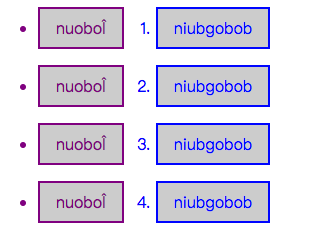
–accent-color css中的变量,类似于currentColor,currentColor只是指当前元素的color颜色的值,但是–accent-color 是指定其值,更像是一个变量名,它可以指定属性后面任何值,可以是颜色,可以是具体像素值,可以给任何一个属性给定多种不同的值。
ul{
	--accent-color:purple;
}
ol{
	--accent-color:blue;
}
li{
	color:var(--accent-color);
	background:#ccc;
	margin:1em;
	border:2px solid currentColor;
}
2
3
4
5
6
7
8
9
10
11
12
# 2. 背景与边框
# 1) 半透明边框
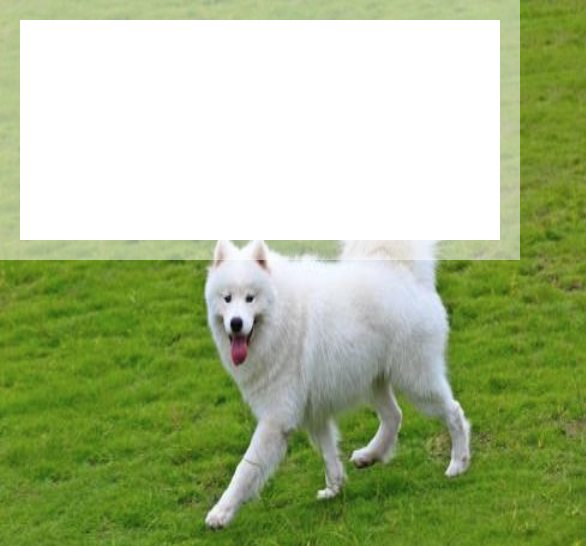
目的:实现一个div,背景为白色,边框为半透明。同事其父级元素的背景从半透明边框上透出来;
key:background-clip:padding-box;
代码:
<div class="one">
	<div class="two"></div>
</div>
2
3
.one{
	height:300px;
	width:300px;
	background: url(images/dog.jpg) center/100% 100% no-repeat border-box;
}
.two{
	width:240px;
	height: 110px;
	background-color:#fff;
	border:10px solid rgba(255,255,255,0.5);
	background-clip:padding-box;
}
2
3
4
5
6
7
8
9
10
11
12
效果:
扩展——background:
background:bg-color bg-image position/bg-size bg-repeat bg-origin bg-clip bg-attachment initial|inherit;
此处需要注意:position和bg-size的关系。写一个的时候,默认为position。
background-position:
| col 1 | col 2 |
|---|---|
| left/right/center top/bottom/center(两两组合) | 如果仅指定一个关键字,其他值将会是"center" |
| x% y% | 第一个值是水平位置,第二个值是垂直。左上角是0%0%。右下角是100%100%。如果仅指定了一个值,其他值将是50%。 。默认值为:0%0% |
| xpos ypos | 第一个值是水平位置,第二个值是垂直。左上角是0。单位可以是像素(0px0px)或任何其他 CSS单位。如果仅指定了一个值,其他值将是50%。你可以混合使用%和positions |
- **
background-size:**length|percentage|cover|contain;(默认为auto)
| col 1 | col 2 |
|---|---|
| length | 设置背景图片高度和宽度。第一个值设置宽度,第二个值设置的高度。如果只给出一个值,第二个是设置为 auto(自动) |
| percentage | 将计算相对于背景定位区域的百分比。第一个值设置宽度,第二个值设置的高度。如果只给出一个值,第二个是设置为"auto(自动)" |
| cover | 此时会保持图像的纵横比并将图像缩放成将完全覆盖背景定位区域的最小大小。 |
| contain | 此时会保持图像的纵横比并将图像缩放成将适合背景定位区域的最大大小。 |
注意
cover和contain都是按图形比例缩放。此时cover为了完全覆盖div,就有可能图片在此div展示不完整(多出来了一部分);此时contain就有可能无法完全覆盖div只是长或者宽其一达到了最大缩放;
而
100% 100%,是进行了不保持长宽比的缩放完全覆盖div;
效果:

- background-origin: padding-box(默认)|border-box|content-box;
如果背景图像background-attachment是"固定",这个属性没有任何效果。
background-clip:(指定背景绘制区域。) border-box(默认值)|padding-box|content-box;
background-attachment: scroll(默认值)|fixed;
# %E8%83%8C%E6%99%AF%E5%AE%9A%E4%BD%8D) 背景定位
关于
background-position和background-origin再扩展一个功能——背景定位;
目的:背景图片做偏移定位
(1)
background: url('images/dog.jpg') no-repeat bottom right #58a;  /* 此处bottom right 只要是为了增加回退方案 */
background-position:right 20px bottom 10px; /*距右下角的偏移*/
2
(2).当box的padding和背景要偏移的值相同时,就可以改为:
padding: 10px;
background: url('images/dog.jpg') no-repeat bottom right #58a;
/* background-position:right 10px bottom 10px; */
background-origin:content-box;
2
3
4
(3).还有一种方式通过calc来实现:
background: url('images/dog.jpg') no-repeat bottom right #58a;
background-position:calc(100% - 20px) calc(100% - 10px);
2
# _2-%E5%A4%9A%E9%87%8D%E8%BE%B9%E6%A1%86) 2) 多重边框

box-shadow:可实现多重边框(注意第四个值为累加)
box-shadow: 0 0 0 10px #655, 0 0 0 15px pink, 0 0 0 35px blue, 5px 5px 10px 42px #000;
outline:可实现二重边框
border: 10px solid pink;
outline: 5px solid green;
2
- outline不切合圆角
border: 5px dashed pink;
border-radius: 10px;
outline: 5px solid green;
2
3
- outline-offset:可设置正值或者负值相对于边框的距离
border: 5px dashed pink;
border-radius: 10px;
outline: 5px solid green;
outline-offset: 20px;//(第四个)
outline-offset: -20px;//(第五个)
2
3
4
5
# 3) 边框内圆角
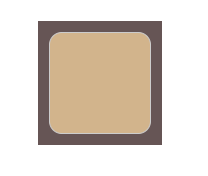
目的:生成内边框为圆角的图形
原理:基于border-radius会贴合边框圆角;outline不会贴合边框圆角;
background:tan;
border-radius: .8em;
box-shadow: 0 0 0 .6em #655; /*投影扩张值不能超过(根号2-1)*r。 */
outline: .7em solid #655;
2
3
4
# 4). 条纹背景
主要是通过渐变实现;
background:linear-gradient(red 50%,yellow 50%);
background-size:100% 25px;
2
渐变中取相等的50%时就是很清晰的两条色带,如果值大小变了 就有渐变效果了。这个25px就是在纵向上每次渐变占据25px,其他就为重复铺设。
上面的第一句等于:
background:linear-gradient(red 50%,yellow 0);/*0即上一个值50%*/
background-size:100% 25px;/*x方向上为100%,y方向上占25px。默认重复*/
2
可以通过增加颜色要实现多个颜色的条纹;
竖条纹:
background:linear-gradient(to right,red 50%,yellow 0);/*0即上一个值50%*/
background-size: 25px 100%;/*y方向上为100%,x方向上占25px。默认重复*/
2
斜条纹: 需要四部分,同时需要进行勾股定理进行计算: 需要条纹宽为a,则background-size的值就设为根号2*a
background:linear-gradient(45deg,yellow 25%,green 0,green 55%,yellow 0,yellow 75%,green 0);
background-size: 42px 42px;
2
**repeating-linear-gradient**实现条纹渐变:
repeating-linear-gradient相对于linear-gradient不需要background-size的配合。就自动重复。
/*45度条纹渐变*/
background:repeating-linear-gradient(45deg,yellow,green 30px);
/*60度条纹渐变*/
background:repeating-linear-gradient(60deg,yellow,green 30px);

/* 从0到15px为red。从接下来的到30px为#58a,所以15px到30px为#58a,这样重复下去。#58a 0处的0,就是相当于15px,和上一个px值相等。 */
background:repeating-linear-gradient(30deg,red, red 15px, #58a 15px, #58a 30px);
2
3
4
5
6
7
同色系条纹:
- 重复条纹渐变实现:
background:repeating-linear-gradient(30deg,#79b,#79b 15px, #58a 0,#58a 30px);
- 透明色覆盖其上改变色调:
background-image:repeating-linear-gradient(30deg,
    hsla(0,0%,100%,0.1),
    hsla(0,0%,100%,0.1) 15px,
    transparent 0,transparent 30px);
2
3
4

# 5) 连续的边框背景

.zero{
	width:100px;
	height:100px;
	padding:1em;
	border:1em solid transparent;
	background:linear-gradient(white,white),
			url('images/dog.jpg');
	background-size:100% 100%;
	background-clip:padding-box, border-box;
}
.one{
	width:100px;
	height:100px;
	padding: 1em;
	border: 1em solid transparent;
	background:repeating-linear-gradient(-45deg,
	red 0, red 12.5%,
	transparent 0,transparent 25%,
	#58a 0, #58a 37.5%,
	transparent 0, transparent 50%)
	0 / 5em 5em;
}
.two{
	width:100px;
	height:100px;
	padding: 1em;
	border: 1em solid transparent;
	background: linear-gradient(white, white) padding-box,
	repeating-linear-gradient(-45deg,
	red 0, red 12.5%,
	transparent 0,transparent 25%,
	#58a 0, #58a 37.5%,
	transparent 0, transparent 50%)
	0 / 5em 5em;
}
.three{
	width:100px;
	height:100px;
	padding:1em;
	border: 16px solid transparent;
	border-image: 16 repeating-linear-gradient(-45deg,
	red 0, red 1em,
	transparent 0,transparent 2em,
	#58a 0, #58a 3em,
	transparent 0, transparent 4em);
}

@keyframes ants{
	to {background-position: 100%;}
}
.four{
	width:100px;
	height:100px;
	padding:1em;
	border:1px solid transparent;
	background:repeating-linear-gradient(-45deg,
	black 0,black 25%,white 0, white 50%) 0 / 1em 1em;
	animation: ants 12s linear infinite;
}
.five{
	width:100px;
	height:100px;
	padding:1em;
	border:1px solid transparent;
	background:linear-gradient(white,white) padding-box,
	repeating-linear-gradient(-45deg,
	black 0,black 25%,white 0, white 50%) 0 / 1em 1em;
	animation: ants 12s linear infinite;
}
.six{
	width:100px;
	height:100px;
	border-top:.2em solid transparent;
	border-image: 100% 0 0 linear-gradient(90deg, currentColor 4em, transparent 0);
	padding-top: 1em;
}
2
3
4
5
6
7
8
9
10
11
12
13
14
15
16
17
18
19
20
21
22
23
24
25
26
27
28
29
30
31
32
33
34
35
36
37
38
39
40
41
42
43
44
45
46
47
48
49
50
51
52
53
54
55
56
57
58
59
60
61
62
63
64
65
66
67
68
69
70
71
72
73
74
75
76
# 3.形状
# 1). 自适应椭圆

.zero{
	width:200px;
	height:100px;
	line-height:100px;
	text-align: center;
	background-color:pink;
	border:2px solid red;
	border-radius: 50% / 50%;
}
.one{
	width:200px;
	height:100px;
	line-height:100px;
	text-align: center;
	border:2px solid red;
	background-color:pink;
	border-radius: 50%  /  100% 100% 0 0;
}
.two{
	width:200px;
	height:100px;
	line-height:100px;
	text-align: center;
	border:2px solid red;
	background-color:pink;
	border-radius:  100% 0 0  100%/ 50%;
}
.three{
	width:200px;
	height:100px;
	line-height:100px;
	text-align: center;
	border:2px solid red;
	background-color:pink;
	border-radius:  100% 0 0 0 / 100% 0 0 0 ;
}
2
3
4
5
6
7
8
9
10
11
12
13
14
15
16
17
18
19
20
21
22
23
24
25
26
27
28
29
30
31
32
33
34
35
36

# 2). 变形元素
.zero{
	position: relative;
	width:200px;
	height:100px;
	line-height:100px;
	text-align: center;
}
.zero::before{
	content:'';
	position: absolute;
	top:0;
	left:0;
	right:0;
	bottom:0;
	border:1px solid #ccc;
	z-index:-1;
	transform: skew(-45deg);
}
2
3
4
5
6
7
8
9
10
11
12
13
14
15
16
17
18
此方法适用于任何变形样式,想变形一个元素而不想变形它的内容。
# 3). 裁切菱形
.zero{
	width:100px;
	height:100px;
	overflow: hidden;
	background: pink;
	transform: rotate(45deg);
}
.zero>img{
	max-width: 100%;
	width:100px;
	height:100px;
	transform: rotate(-45deg) scale(1.42);
}

.one{
	width:200px;
	height:100px;
	border:1px solid black;
}
.one > img{
	width:100px;
	height:100px;
	clip-path: polygon(50% 0, 100% 50%, 50% 100%, 0 50%);
	transition: clip-path 1s;
}
/*hover回到原图*/
.one > img:hover{
	clip-path: polygon(0 0, 100% 0, 100% 100%, 0 100%);/* 0 0 是左上角,100% 0 是右上角,100% 100%是右下角,0 100% 是左下角 */
}
2
3
4
5
6
7
8
9
10
11
12
13
14
15
16
17
18
19
20
21
22
23
24
25
26
27
28
29

# 4). 切角
.zero,.one,.two,.three,.four,.five,.six{
	width:100px;
	height:100px;
	line-height:100px;
	text-align: center;
}
.zero{
	background:#58a;
	background: linear-gradient(-45deg,transparent 15px,#58a 0) ;
}
.one{
	background:#58a;
	background: linear-gradient(-45deg,transparent 15px,#58a 0) right,
	linear-gradient(45deg,transparent 15px,#655 0) left;
	background-size: 50% 100%;
	background-repeat: no-repeat;
}
.two{
	background:#58a;
	background: radial-gradient(circle at top right,transparent 15px,#58a 0) right,
	radial-gradient(circle at left,transparent 15px,#655 0) left;
	background-size: 50% 100%;
	background-repeat: no-repeat;
}
.three{
	background:#58a;
	background: linear-gradient(-135deg,transparent 15px,#58a 0) top right,
	linear-gradient(135deg,transparent 15px,#655 0) top left,
	linear-gradient(-45deg,transparent 15px,#655 0) bottom right,
	linear-gradient(45deg,transparent 15px,#655 0) bottom left;
	background-size: 50% 50%;
	background-repeat: no-repeat;
}
.four{
	background:#58a;
	background: radial-gradient(circle at top right,transparent 15px,#58a 0) top right,
	radial-gradient(circle at top left,transparent 15px,#655 0) top left,
	radial-gradient(circle at bottom left,transparent 15px,#655 0) bottom left,
	radial-gradient(circle at bottom right,transparent 15px,#655 0) bottom right;
	background-size: 50% 50%;
	background-repeat: no-repeat;
}
2
3
4
5
6
7
8
9
10
11
12
13
14
15
16
17
18
19
20
21
22
23
24
25
26
27
28
29
30
31
32
33
34
35
36
37
38
39
40
41
42
在sass可以这样mixin,可以直接调用:beveled-corners(#58a, 15px, 5px):
@mixin beveled-corners($bg,
$tl:0, $tr:$tl, $br:$tl, $bl:$tr) {
	background:$bg;
	background: linear-gradient(-135deg,transparent $tl,$bg 0) top right,
	linear-gradient(135deg,transparent $tr,$bg 0) top left,
	linear-gradient(-45deg,transparent $br,$bg 0) bottom right,
	linear-gradient(45deg,transparent $bl,$bg 0) bottom left;
	background-size: 50% 50%;
	background-repeat: no-repeat;
}
2
3
4
5
6
7
8
9
10
# 5). 梯形
.one{
	position: relative;
	width:120px;
	height:50px;
	line-height: 50px;
	display: inline-block;
	padding: .5em 1em .35em;
	color:#000;
}
.one::after{
	content:'';
	position: absolute;
	top:0;right:0;left:0;bottom:0;
	z-index:-1;
	background-color: #58a;
	transform: scaleY(1.3) perspective(.5em) rotateX(5deg);//scaleY(1.3)为了补充由于旋转失去的部分高度
	transform-origin: bottom;
}
2
3
4
5
6
7
8
9
10
11
12
13
14
15
16
17
18
# 4. 视觉效果
# 1). 单侧阴影

.two{
	background:#58a;
	box-shadow: 0 8px 4px -4px #000;/* 使得扩展半径和模糊半径相等时,可消除相应侧的阴影值 */
}
.three{
	background:#58a;
	box-shadow: 5px 5px 6px -3px #000;
}
.four{
	background:#58a;
	box-shadow: 8px 0px 5px -5px #000,
				-8px 0px 5px -5px #000;
}
2
3
4
5
6
7
8
9
10
11
12
13
# 2). 不规则投影

.two{
	background: linear-gradient(-45deg, transparent 15px, red 0);
	box-shadow: 2px 2px 10px rgba(0,0,0,0.5);
}
.three{
	background: linear-gradient(-45deg, transparent 15px, red 0);
	filter: drop-shadow(2px 2px 10px rgba(0,0,0,0.5));
}
.four{
	border: 3px dashed blue;
	box-shadow: 2px 3px 10px 4px rgba(255,0,0,0.5);
}

.five{
	border: 5px dashed blue;
	filter: drop-shadow(2px 3px 10px rgba(255,0,0,0.5));
}
.six{
	width:200px;
	height:100px;
	line-height:1em;
	border: 5px dashed blue;
	filter: drop-shadow(2px 3px 3px rgba(255,0,0,1));
}
.six div{
	border:3px solid #000;
	margin: 10px;
	/* filter: drop-shadow(2px 3px 3px rgba(255,0,0,0)); *//*无用,不能取消子元素的阴影*/
	filter:none;/*无用,不能取消子元素的阴影*/
}
2
3
4
5
6
7
8
9
10
11
12
13
14
15
16
17
18
19
20
21
22
23
24
25
26
27
28
29
30
filter没有inset,没有扩张半径,其对每个元素都会产生阴影效果,包括其中的文字。
# 扩展filter:
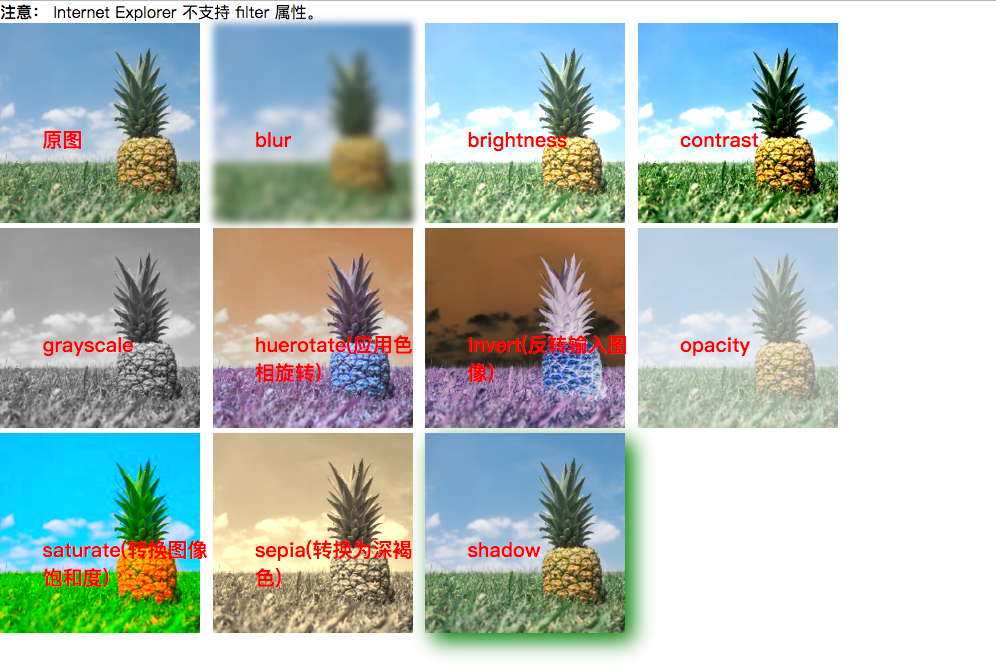
.blur {
	-webkit-filter: blur(4px);
	filter: blur(4px);
}
.brightness {
	-webkit-filter:brightness(1.30);
	filter: brightness(1.30);
}
.contrast {
	-webkit-filter: contrast(180%);
	filter: contrast(180%);
}
.grayscale{
	-webkit-filter: grayscale(100%);
	filter: grayscale(100%);
}
.huerotate {
	-webkit-filter: hue-rotate(180deg);
	filter: hue-rotate(180deg);
}
.invert {
	-webkit-filter: invert(100%);
	filter: invert(100%);
}
.opacity {
	-webkit-filter: opacity(50%);
	filter: opacity(50%);
}
.saturate {
	-webkit-filter: saturate(7);
	filter: saturate(7);
}
.sepia {
	-webkit-filter: sepia(100%);
	filter: sepia(100%);
}
.shadow{
	-webkit-filter: drop-shadow(8px 8px 10px green);
	filter: drop-shadow(8px 8px 10px green);
}
2
3
4
5
6
7
8
9
10
11
12
13
14
15
16
17
18
19
20
21
22
23
24
25
26
27
28
29
30
31
32
33
34
35
36
37
38
39
40
# 3). 毛玻璃效果
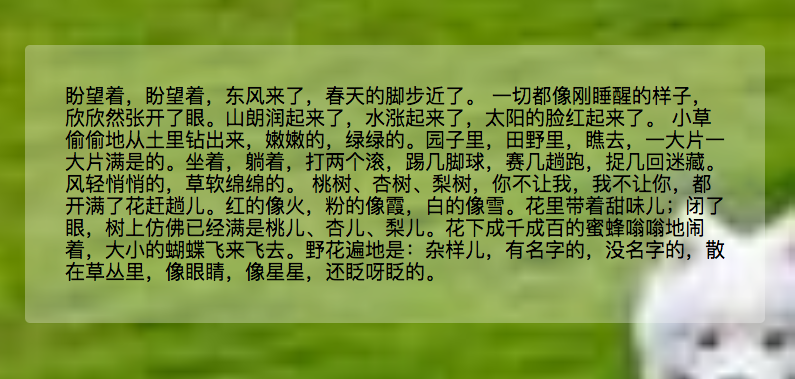
这个代码做出来的效果和调背景透明度的效果基本一致,不知道问题在哪,在此不贴代码了,书上针对的是背景使用的fixed的效果,感觉不常用,不作研究了。
# 扩展background-attachment:fixed
又长见识了,虽然不常用
需要明白——background-attachment:fixed,其fixed的对象是可见视窗,所以基本是以body为参考的,如此我在div中使用这个就感觉不对,背景被一部分裁切了。
用background-attachment:fixed做动画效果
当我将浏览器放大到不同尺寸时,屏幕上的效果不同表现为:
.zero{
	background: url('images/tiger.jpg') 0/cover fixed;
}
.one{
	background: url('images/tiger.jpg') 0/cover fixed;
}
...
.six{
	background: url('images/tiger.jpg') 0/cover fixed;
}
2
3
4
5
6
7
8
9
10
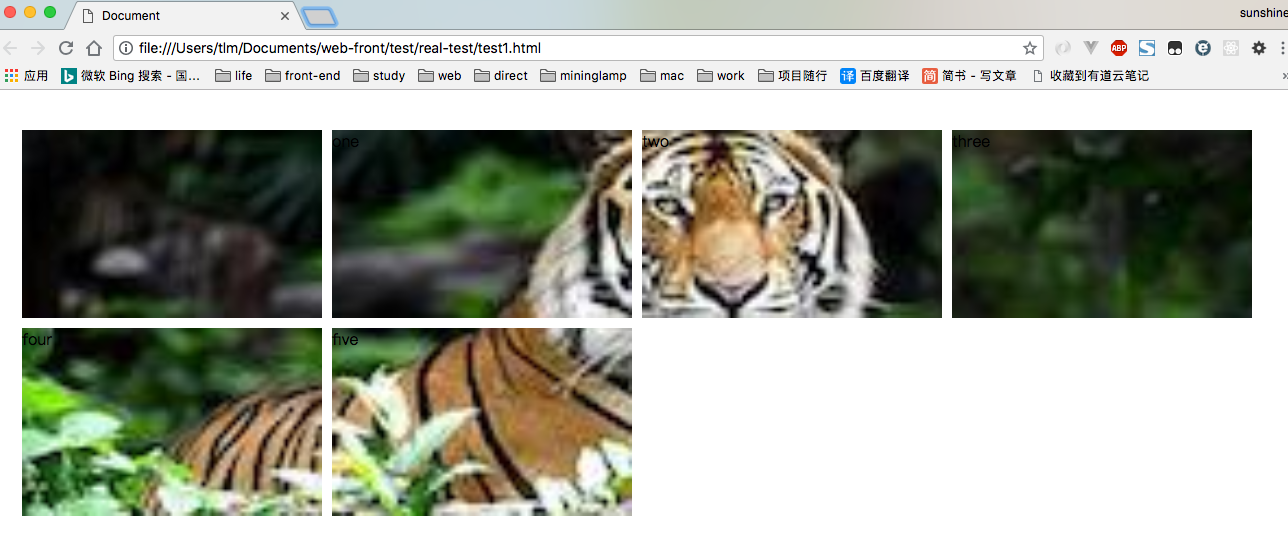
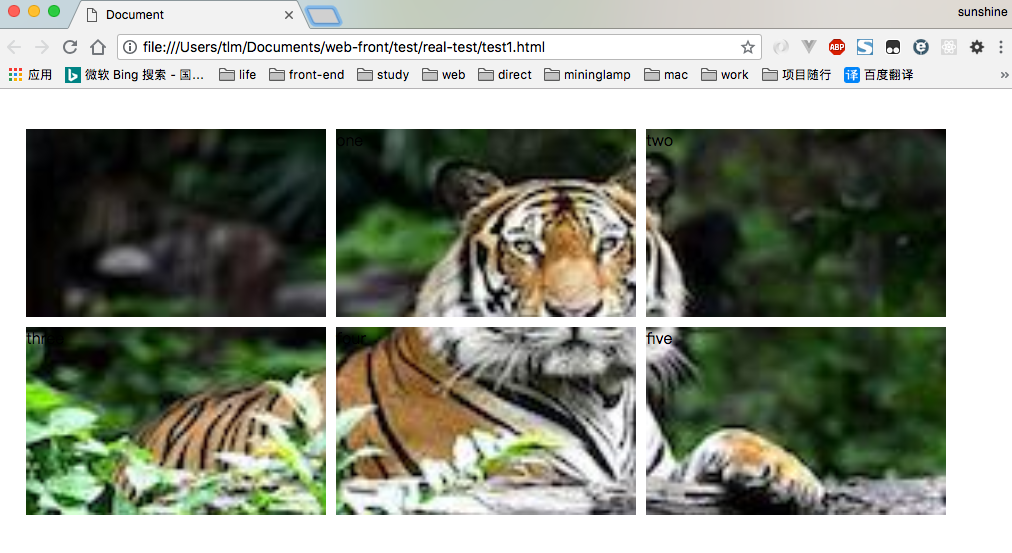
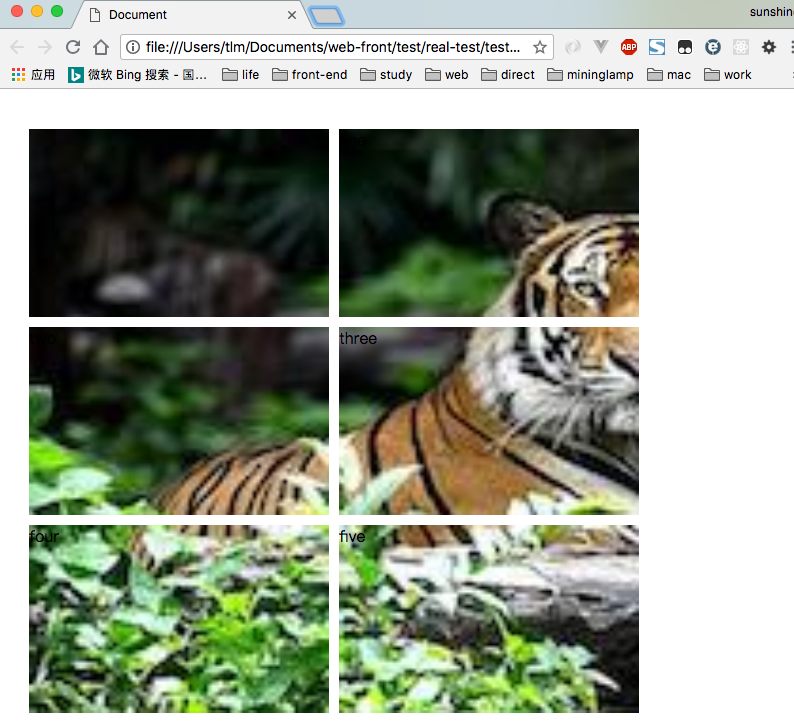
综上: 毛玻璃效果的代码如下:
body{
	background: url('images/tiger.jpg') 0/cover fixed;
}
main{
	position: relative;
	background:hsla(0, 0%,100%,.3);
	overflow: hidden;
}
main:before{
	content:'';
	position: absolute;
	top:0;right:0;left:0;bottom:0;
	filter:blur(20px);
	margin:-30px;
}
2
3
4
5
6
7
8
9
10
11
12
13
14
15
# 4) 折角效果

.zero{
	background:#58a;
	background: linear-gradient(to left bottom, transparent 50%, rgba(0,0,0,0.4) 0)  no-repeat 100% 0/ 2.83em 2.83em,
	linear-gradient(to left bottom, transparent 2em, #58a 0);
}
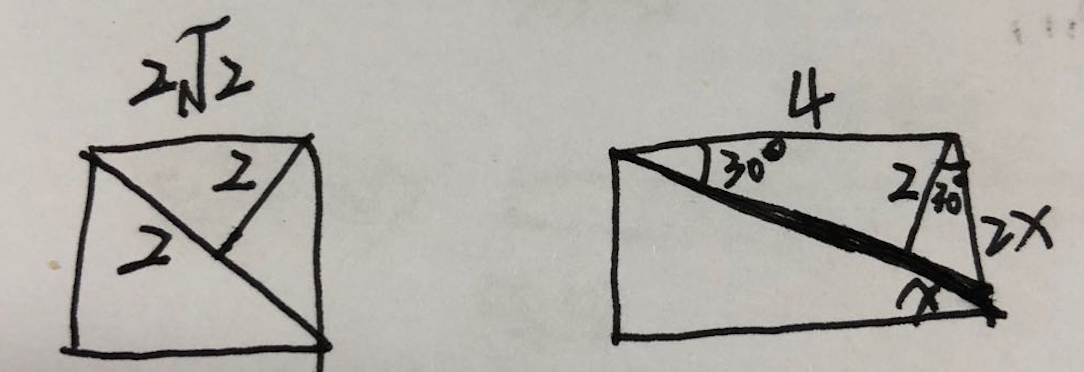
// 此处为何折角的宽高为此值——要明白,切角,是沿着斜方向的距离为2em。所以宽高就要乘以根2了。见下图
.one{
	background:#58a;
	background: linear-gradient(to left bottom, transparent 50%, rgba(0,0,0,0.4) 0)  no-repeat 100% 0/ 4em 2.309em,
	linear-gradient(-150deg, transparent 2em, #58a 0);
}
// 此处为何折角的宽高为此值——见下图
.two{
	position: relative;
	background:#58a;
	background: linear-gradient(-150deg, transparent 2em, #58a 0);
}
.two:before{
	content:'';
	position: absolute;
	top:0;right:0;
	background: linear-gradient(to left bottom, transparent 50%, rgba(0,0,0,0.4) 0)  no-repeat;
	height:4em;
	width:2.309em;
	/* transform: translateY(-1.7em) rotate(-30deg); */
	/* transform-origin: bottom right; */
}
// three是在two的基础上加了旋转和上移动
.three{
	position: relative;
	background:#58a;
	background: linear-gradient(-150deg, transparent 2em, #58a 0);
}
.three:before{
	content:'';
	position: absolute;
	top:0;right:0;
	background: linear-gradient(to left bottom, transparent 50%, rgba(0,0,0,0.4) 0)  100% 0 no-repeat;
	height:4em;
	width:2.309em;
	transform: translateY(-1.7em) rotate(-30deg);
	transform-origin: bottom right;
}
.four{
	position: relative;
	background:#58a;
	background: linear-gradient(-150deg, transparent 2em, #58a 0);
	border-radius: .5em;
}
.four:before{
	content:'';
	position: absolute;
	top:0;right:0;
	background: linear-gradient(to left bottom, transparent 50%, rgba(0,0,0,0.2) 0, rgba(0,0,0,0.4))  100% 0 no-repeat;
	height:4em;
	width:2.309em;
	transform: translateY(-1.7em) rotate(-30deg);
	transform-origin: bottom right;
	border-bottom-left-radius:inherit;
	box-shadow: -0.2em 0.2em 0.3em -0.1em rgba(0,0,0,0.15);
}
2
3
4
5
6
7
8
9
10
11
12
13
14
15
16
17
18
19
20
21
22
23
24
25
26
27
28
29
30
31
32
33
34
35
36
37
38
39
40
41
42
43
44
45
46
47
48
49
50
51
52
53
54
55
56
57
58
59
60
61
# 5. 文字效果
# 1). 自定义列表的插入换行
<dl>
	<dt>Name:</dt>
	<dd>Lea hih</dd>
	<dt>Email:</dt>
	<dd>niunobnobobobio</dd><dd>buiboubuupap</dd>
	<dt>Location:</dt>
	<dd>niubobobboi9hte</dd>
</dl>
2
3
4
5
6
7
8
dl{
	border:1px solid #ccc;
	padding:10px;
}

dd{
	margin:0;
	font-weight: bold;
}
dd,dt{
	display: inline;
}
//下面三个都可以
/* dd + dt:before */
/* dt:not(:first-child):before{ */
dt ~ dt:before{
	content:'\A';
	white-space: pre;
}
dd + dd:before{
	content:', ';
	font-weight: bold;
}
2
3
4
5
6
7
8
9
10
11
12
13
14
15
16
17
18
19
20
21
22
23
# 2). 文本的斑马纹和tab-size
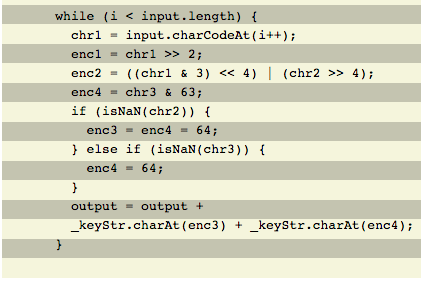
pre{
	tab-size: 2;
	padding:0.5em;
	line-height: 1.5em;
	background:beige;
	background-image:linear-gradient(rgba(0,0,0,0.2) 50%, transparent 0);
	background-size: auto 3em;
	background-origin:content-box;
}
2
3
4
5
6
7
8
9
# 3). 凸版印刷效果
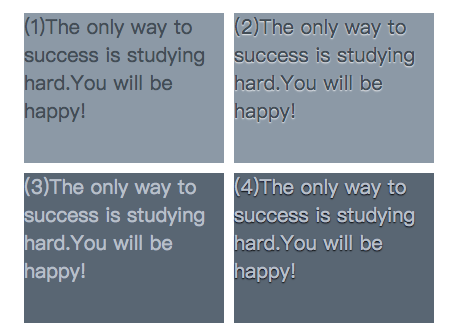
// 背景为浅色,字为深色,字投影要用浅色投影;(1)和(2)分别为加投影前后的效果
.one{
	background:hsl(210, 13%, 60%);
	color: hsl(210,13%,30%);
	text-shadow: 0 1px 1px hsla(0,0%,100%,0.8);
}
// 背景为深色,字为浅色,字投影要用深色投影(3)和(4)分别为加投影前后的效果
.two{
	background:hsl(210, 13%, 40%);
	color: hsl(210,13%,75%);
	text-shadow: 0 1px 1px black;
}
2
3
4
5
6
7
8
9
10
11
12
# 4) 空心字、字外发光、立体字效果

.two{
	background:deeppink;
	color: white;
	font-size:50px;
	text-shadow: 1px 1px black, -1px -1px black,
				1px -1px black,-1px 1px black;
}
.three{
	background:deeppink;
	color: white;
	font-size:50px;
	text-shadow: 0 0 1px black, 0 0 1px black,
				0 0 1px black,0 0 1px black,
				0 0 1px black,0 0 1px black,
				0 0 1px black,0 0 1px black;
}
.four{
	background:#203;
	color:#ffc;
	text-shadow: 0 0 0.1em,0 0 0.3em;
}
.five{
	background:#58a;
	color:white;
	text-shadow: 0 1px hsl(0,0%,85%),
				0 2px hsl(0,0%,80%),
				0 3px hsl(0,0%,75%),
				0 4px hsl(0,0%,70%),
				0 5px hsl(0,0%,65%),
				0 5px 10px black;
}
2
3
4
5
6
7
8
9
10
11
12
13
14
15
16
17
18
19
20
21
22
23
24
25
26
27
28
29
30
31
# 5). 文字下划线

body {
	font: 200%/1.6 Baskerville, Palatino, serif;
}

p:nth-child(1) a {
	text-decoration: underline;
}
p:nth-child(2) a {
	background: linear-gradient(gray, gray) no-repeat;
	background-size: 100% 1px;
	background-position: 0 1.02em;
	text-shadow: .05em 0 white, -.05em 0 white;
}

p:nth-child(3) a {
	background: linear-gradient(90deg, gray 66%, transparent 0) repeat-x;
	background-size: .2em 2px;
	background-position: 0 1em;
}

p:nth-child(4) a {
	background: linear-gradient(-45deg, transparent 40%, red 0, red 60%, transparent 0) 0 1em,
				linear-gradient(45deg, transparent 40%, red 0, red 60%, transparent 0) .1em 1em;
	background-repeat: repeat-x;
	background-size: .2em .1em;
	text-shadow: .05em 0 white, -.05em 0 white;
}
2
3
4
5
6
7
8
9
10
11
12
13
14
15
16
17
18
19
20
21
22
23
24
25
26
27
# 6.用户体验
# 1). 单选和复选框样式
<input type="checkbox" id="awesome" autofocus />
<label for="awesome">自动聚焦!</label>

<input type="checkbox" id="awesome2" checked />
<label for="awesome2">选中!</label>

<input type="checkbox" id="awesome3" disabled />
<label for="awesome3">不可用!</label>

<input type="checkbox" id="awesome4" checked disabled />
<label for="awesome4">选中的情况下不可用!</label>
<br />
<input type="radio" name="one" id="awesome11" autofocus />
<label for="awesome11">自动聚焦!</label>
<input type="radio" name="one" id="awesome22" checked/>
<label for="awesome22">选中!</label>
<input type="radio" name="one" id="awesome33" disabled />
<label for="awesome33">不可用!</label>
<input type="radio" name="two" id="awesome33" disabled checked/>
<label for="awesome33">选中的情况下不可用!</label>
2
3
4
5
6
7
8
9
10
11
12
13
14
15
16
17
18
19
20
input[type="checkbox"],input[type="radio"]  {
	position: absolute;
	clip: rect(0,0,0,0);
}

input[type="checkbox"] + label::before, input[type="radio"] + label::before{
	content: '\a0';
	display: inline-block;
	width: .8em;
	height: .8em;
	margin-right: .2em;
	border-radius: .2em;
	background: silver;
	text-indent: .15em;
}
input[type="checkbox"] + label::before{
	vertical-align: .2em;
	line-height: .65;
}
input[type="radio"] + label::before{
	line-height: .85;
}

input[type="checkbox"]:checked + label::before {
	content: '\2713';
	background: yellowgreen;
}
input[type="radio"]:checked + label::before {
	content: '\25C9';
	background: transparent;
	color:rgb(38, 143, 230);
	text-indent: -.15em;
}

input[type="checkbox"]:focus + label::before, input[type="radio"]:focus + label::before  {
	box-shadow: 0 0 .1em .1em #58a;
}

input[type="checkbox"]:disabled + label::before {
	background: gray;
	box-shadow: none;
	color: #555;
	cursor: not-allowed;
}
input[type="radio"]:disabled + label::before {
	background: gray;
	box-shadow: none;
	color: rgb(7, 1, 32);
	cursor: not-allowed;
}
2
3
4
5
6
7
8
9
10
11
12
13
14
15
16
17
18
19
20
21
22
23
24
25
26
27
28
29
30
31
32
33
34
35
36
37
38
39
40
41
42
43
44
45
46
47
48
49
50

# 2). 滚动上下的过度样式
ul {
	display: inline-block;
	overflow: auto;
	width: 7.2em;
	height: 7em;
	border: 1px solid silver;
	padding: .3em .5em;
	list-style: none;
	margin-top: 2em;
	font: 100 200%/1.6 'Frutiger LT Std', sans-serif;
	background: linear-gradient(white 15px, hsla(0,0%,100%,0)) 0 0 / 100% 50px,
	            radial-gradient(at top, rgba(0,0,0,.2), transparent 70%) 0 0 / 100% 15px,
	            linear-gradient(to top, white 15px, hsla(0,0%,100%,0)) bottom / 100% 50px,
	            radial-gradient(at bottom, rgba(0,0,0,.2), transparent 70%) bottom / 100% 15px;
	background-repeat: no-repeat;
	background-attachment: local, scroll, local, scroll;
	margin-top: 30px;
}
2
3
4
5
6
7
8
9
10
11
12
13
14
15
16
17
18
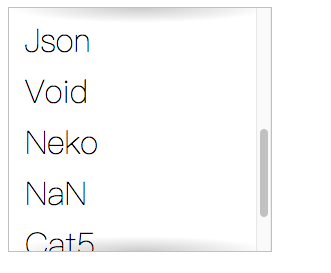
# 3). css resize
实现一个效果,左边div可以拖动控制宽度,右边随左边的宽度变化。
body{ //父元素使用flex布局。
	display:flex;
	justify-content: flex-start;
	align-items: center;
}
ul {
	display: inline-block;
	width: 7.2em;
	height: 7em;
	border: 1px solid silver;
	overflow-x: hidden;
	overflow-y: auto;
	resize: horizontal;
}
div{
	width:100%;
	height:100px;
	border:1px solid #ccc;
}
2
3
4
5
6
7
8
9
10
11
12
13
14
15
16
17
18
19

# 4). 交互式的图片对比控件
(http://dabblet.com/gist/b7e7fef7dcf9a7161a51)
# 7. 结构与布局
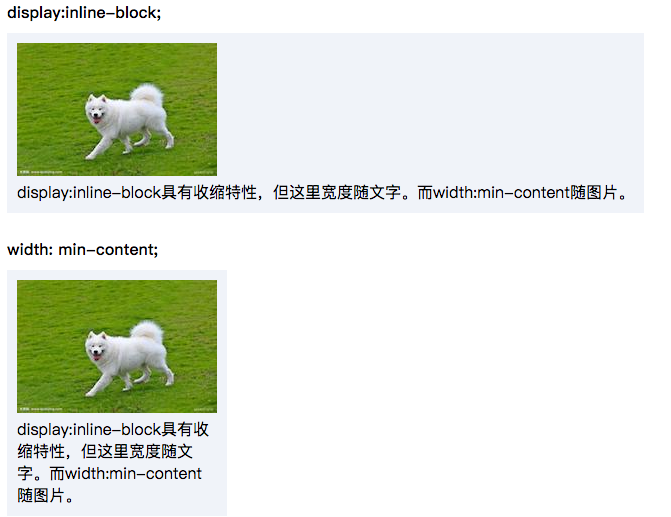
# 1). width:min-content;
HTML代码:
<strong>display:inline-block;</strong>
<div class="box inline-block">
    <img src="mm1.jpg">
    <p>display:inline-block具有收缩特性,但这里宽度随文字。而width:min-content随图片。</p>
</div>

<strong>width: min-content;</strong>
<div class="box min-content">
    <img src="mm1.jpg">
    <p>display:inline-block具有收缩特性,但这里宽度随文字。而width:min-content随图片。</p>
</div>
2
3
4
5
6
7
8
9
10
11
css代码:
.box {
	background-color: #f0f3f9;
	padding: 10px;
	margin: 10px 0 20px;
	overflow: hidden;
}

.inline-block {
	display: inline-block;
}
.min-content {
	max-width: 300px;/*  回退方案 */
	width: -webkit-min-content;
	width: -moz-min-content;
	width: min-content;
}
.min-content img{
	width:inherit;
}
2
3
4
5
6
7
8
9
10
11
12
13
14
15
16
17
18
19
# 2). table-layout:fixed;
表格的单元格通常会根据内容来调整宽高,而当给单元格设置了宽度的时候,不起作用,此时只需要针对表格或者display:table;的元素添加代码:
table-layout:fixed;
这个属性的默认值是table-layout:auto;称为自动表格布局算法;
对此,设置了表格单元格的宽度后,在页面下载过程中,不需要频繁重绘。同时像一些需要省略号来表示的表格内容也助于实现。
# 3). 根据兄弟元素的数量来设置样式
知识点:
- ~ :匹配到自己之后的兄弟元素。
li:only-child:只有一个列表项的时候;only-child=:first-child:last-childlast-child:=nth-last-child(1)li:first-child:nth-last-child(4):匹配到列表项有四个元素的时候- sass的一个知识点:
@content;(可以在定义mixin时只用来匹配元素)
/* 定义选择器 */
@mixin n-items($n){
	&:first-child:btn-last-child(#{$n}),
	&:first-child:btn-last-child(#{$n}) ~ & {
		@content;
	}
}
/* 调用 */
li {
	@include n-items(4) {
		/* 属性与值写在这里 */
	}
}
2
3
4
5
6
7
8
9
10
11
12
13

li:first-child:nth-last-child(4),
li:first-child:nth-last-child(4) ~ li{
	/* 当列表项恰好包含4项时,命中所有列表项 */
	border:1px solid #ccc;
}
ul.one li:first-child:nth-last-child(4) ~ li{
	background:aqua;
}

li:first-child:nth-last-child(n+5),
li:first-child:nth-last-child(n+5) ~ li{
	/* 当列表项最少包含5项时,命中所有列表项 */
	background:antiquewhite;
	border-bottom: 1px solid red;
}
li:first-child:nth-last-child(-n+3),
li:first-child:nth-last-child(-n+3) ~ li{
	/* 当列表项最多包含3项时,命中所有列表项 */
	background:orchid;
	border-bottom: 1px solid blue;
}

li:first-child:nth-last-child(n+6):nth-last-child(-n+8),
li:first-child:nth-last-child(n+6):nth-last-child(-n+8) ~ li{
	/* 当列表项包含6~8项时,命中所有列表项;实践证明——只要列表项的总数在6,7,8中任何一个就命中了,超过或者少于都不可 */
	background:pink;
	border-bottom: 1px solid yellowgreen;
}
2
3
4
5
6
7
8
9
10
11
12
13
14
15
16
17
18
19
20
21
22
23
24
25
26
27
28
# 4). 内容定宽水平居中
//html
<footer>
	<!-- 内容 -->
</footer>
//css
footer{
	max-width: 900px;//此句可不要
	padding:1em calc(50% - 450px);
	background:#333;
}
2
3
4
5
6
7
8
9
10
此方法等效于:
//html
<footer>
	<div class="wrapper">
		<!-- 内容 -->
	</div>
</footer>
//css
.wrapper{
	max-width: 900px;
	margin:1em auto;
}
2
3
4
5
6
7
8
9
10
11
**优点:**少使用了一个元素
# 5).垂直居中
# 水平居中:
- 子元素是行内元素:在父元素上写
text-align:center; - 子元素是定宽块状元素: 自身上使用
margin:auto;
# 垂直居中:
- 法一:(定宽,绝对定位,负margin)
main {
	position: absolute;
	top: 50%;
	left: 50%;
	width:200px;
	height:100px;
	margin-top:-100px;
	margin-left:-50px;
	box-sizing: border-box;

}
2
3
4
5
6
7
8
9
10
11
- 法二:(绝对定位,translate)
main {
	position: absolute;
	top: 50%;
	left: 50%;
	transform: translate(-50%, -50%);
	padding: 1em 1.5em;
	box-sizing: border-box;
	background: #655;
	color: white;
	text-align: center;
}
// 此方法可加`transform-style:preserve-3d;`修复某些浏览器元素显示的模糊问题(元素可能被放置在半个像素上)
2
3
4
5
6
7
8
9
10
11
12
- 法三: (margin-top基于视窗为50vh,整个视窗高为100vh,translateY向上移动50%)
main {
	width: 18em;
	padding: 1em 1.5em;
	margin: 50vh auto 0;
	transform: translateY(-50%);
	box-sizing: border-box;
	background: #655;
	color: white;
	text-align: center;
}
2
3
4
5
6
7
8
9
10
- 法四: 最好用的flex布局方式——也是我最喜欢用的(略)
# 8. 动画
css3动画没怎么应用实践过,所以——感触不深。。。此处只按原文敲写代码做一感受。
# 1). 球弹跳效果
@keyframes bounce {
	60%, 80%, to {
		transform: translateY(400px);
		animation-timing-function: ease;
	}
	70% { transform: translateY(300px); }
	90% { transform: translateY(360px); }
}

.ball {
	width: 0; height: 0; padding: 1.5em;
	border-radius: 50%;
	margin: auto;
	background: red radial-gradient(at 30% 30%, #fdd, red);
	animation: bounce 2s cubic-bezier(.1,.25,1,.25) forwards;
}

body {
	background: linear-gradient(skyblue, white 450px, yellowgreen 0);
	min-height: 100vh;
}
2
3
4
5
6
7
8
9
10
11
12
13
14
15
16
17
18
19
20
21
# 3). 逐针动画
@keyframes loader {
	to { background-position: -800px 0; }
}

.loader {
	width: 100px; height: 100px;
	text-indent: 999px; overflow: hidden; /* Hide text */
	background: url(http://dabblet.com/img/loader.png) 0 0;
	animation: loader 1s infinite steps(8);
}
2
3
4
5
6
7
8
9
10
图片是:八个状态分8步完成。(一般使用gif来实现)

# 3). 闪烁效果
<style>
	@keyframes blink-1 { 50% { color: transparent } }
	@keyframes blink-2 { to { color: transparent } }

	p {
		padding: 1em;
		background: gold;
	}

	.blink-smooth-1 {
		animation: 1s blink-1 3;
	}

	.blink-smooth-2 {
		animation: .5s blink-2 6;
		animation-direction: alternate;/* 反转每一个选好周期 */
	}

	.blink {
		animation: 1s blink-1 3 steps(1);/* 最普通的闪烁效果*/
	}

</style>
</head>
<body>
	<p class="blink-smooth-1">Peek-a-boo!</p>
	<p class="blink-smooth-2">Peek-a-boo!</p>
	<p class="blink">Peek-a-boo!</p>
</body>
2
3
4
5
6
7
8
9
10
11
12
13
14
15
16
17
18
19
20
21
22
23
24
25
26
27
28
29
# 4). 打字动画效果
<style>
	@keyframes typing {
		from { width: 0 }
	}

	@keyframes caret {
		50% { border-right-color: transparent; }
	}

	h1 {
		font: bold 200% Consolas, Monaco, monospace;
		/*width: 8.25em;*/ //回退方案
		/* width: 15ch; */
		white-space: nowrap;
		overflow: hidden;
		border-right: .05em solid;
		animation: typing 8s steps(15),
				caret 1s steps(1) infinite;
	}
</style>
<h1>CSS is awesome!</h1>
<script>
	var len = $('h1')[0].textContent.length, //textContent为元素的文本内容,包括其后代的。
	s =  $('h1')[0].style;
	console.log(len); //15
	s.width = len +'ch'; // ch是css3的单位,表示‘0’字形的宽度,在等宽字体中,‘0’字形的宽度和其他字形的宽度是一样的。
	s.animationTimingFunction = 'steps('+len+'),steps(1)';
</script>
2
3
4
5
6
7
8
9
10
11
12
13
14
15
16
17
18
19
20
21
22
23
24
25
26
27
28
# 5). 状态平滑的动画
主要在这个属性animation-play-state: running/paused;,类太阳系实践中刚使用过:
@keyframes panoramic {
	to { background-position: 100% 0; }
}

.panoramic {
	width: 150px; height: 150px;
	background: url('http://c3.staticflickr.com/3/2671/3904743709_74bc76d5ac_b.jpg');
	background-size: auto 100%;
	animation: panoramic 10s linear infinite alternate;
	animation-play-state: paused;
}

.panoramic:hover, .panoramic:focus {
	animation-play-state: running;
}
2
3
4
5
6
7
8
9
10
11
12
13
14
15
# 6). 沿环形路径平移的动画
两个元素的方案:
<div class="path">
	<div class="avatar">
		<img src="http://lea.verou.me/book/adamcatlace.jpg" />
	</div>
</div>
2
3
4
5
@keyframes spin {
	to { transform: rotate(1turn); }
}

.avatar {
	animation: spin 3s infinite linear;
	transform-origin: 50% 150px;
}

.avatar > img {
	animation: inherit;
	animation-direction: reverse;
}

/* Anything below this is just styling */

.avatar {
	width: 50px;
	margin: 0 auto;
	border-radius: 50%;
	overflow: hidden;
}

.avatar > img {
	display: block;
	width: inherit;
}

.path {
	width: 300px; height: 300px;
	padding: 20px;
	border-radius: 50%;
	background: #fb3;
}
2
3
4
5
6
7
8
9
10
11
12
13
14
15
16
17
18
19
20
21
22
23
24
25
26
27
28
29
30
31
32
33
34
